Author Topic: THE SILENT HUNTER III - MISSION ARCHIVE - NEW REPORTING PROCEDURES !  (Read 4702 times)

Offline Eberhard Godt

  • BdU/Flottillenchef
  • acts ELiTE - IS ELiTE!
  • *******
  • Posts: 183
  • ELiTE Skill Level:
    0%
  • Chef der Operationsabteilung
ACHTUNG!

We have got new reporting procedures, so please pay attention and follow them carefully!

Here are our OLD ones for archive purposes:
  • Mission Briefing Format: show

    Here is the proper format along with a brief description, to use when preparing your mission briefing details:

    File-Name:  CA2878_19420428_SP_GWX_RUM_U-136_vs_Arundo.mis
    Misson-Name: U-136 vs Arundo
    Mission Description: You are Kapitänleutnant Heinrich Zimmermann, Kaleun of U-136.
    While hunting off the New Jersey Coast during Operation Paukenschlag, the watch
    spots a lone freighter, the merchant Arundo, heading South off your port beam.
    Location:  CA2878, [AT] East of New Jersey
    Date: 19420428, 10:30
    Necessary Mega-Mod: GWX
    Players: 1
    Recommended U-Boot-Type: VIIc, 1941
    Last updated: 20121109
    Mission created by: marv2112

    • File-Name: KMPQ6dg_Date_PlayerType_MOD_MissionType_Title.mis
      • KMPQ6dg is the Kriegsmarine-Planquadrat-position (="grid") where this takes place, in 6 digits LLNNNN (example:  CA2878)
      • Location should appear as KMPQ6dg (see above) + a brief area-description
      • Accurate date should appear as YYYYMMDD (example: 19420428)
      • PlayerType should appear either "SP" for singleplayer or "MP" for multiplayer
      • Mod Type should be GWM or GWX or 14b (one only)
      • MissionType - "type" can have these values:
        • RUM - Reenacted = if it is a recreation of an historical event
        • FIC - if it is fictional
        • SpecOp = if it is a Special Operation
        and replace the term "xOPx" with either RUM, FIC, SpecOp.
      • Title should have underscore "_" instead of blank spaces
      • File name should always end with .mis as the file type extension
    • Mission-Name: should be the Title portion of the File Name with blank spaces instead of underscore "_" between the words.
    • Mission Description: This should be a brief, concise description of the mission so potential users will have a good idea of what the mission is about.
    • Date: YYYYMMDD format and time in HH:MM format (example: 19420428, 10:30)
    • Necessary Mega-Mod: only one that the mission was created for (example:  GWX)
    • Players: number of players indicated/specified in the mission, fewest to max number of u-boote placed in the mission (example: 2 - 6, or 1 for SP mission)
    • Recommended U-Boot-Type: type, and year as specified in mission description (example: VIIc, 1941)
    • Last updated: YYYYMMDD format, usually the date the mission file was last modded.
    • Mission created by: self explanatory.
    If you adhere to the above formatting, you should have no issues when posting your mission briefing details.
  • Building and Sending Contact Reports for Verified Multiplayer Missions: show

    You will need the data from the mission file which you intend to send the contact report. 
    Get it from the current working pack.  In this example here it is Pack #01:  http://www.donitzeliteflotilla.com/forum/index.php?board=91


    These missions will be found in various Packs as they are uploaded to our forum server.  Select the one to work on.  In this example, we will choose the first mission listed:  KE5746_19450129_MP_GWM_Convoy CM60.mis
    All of the mission details required for the report can be obtained from the file name.

    Next, you will need to start Operation Spinnennetz Client.

    2. Select Build Contact Report (double click on it):


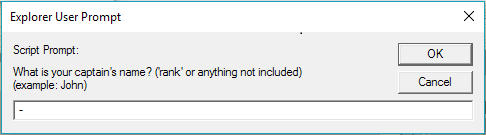
    3.  DEF User name, this is ignored, just enter a – (dash).


    4.  Anytime you happen to receive this message, simply select “NO”:


    5.  U-boot-name:  enter your u-boot number, including the dash (example:  U-128)


    6.  6 character grid code is ignored in this case, just enter a – (dash).


    7.  Nationality of contact is unimportant, just enter a  – (dash).


    8.  Ship, group or convoy information must always be listed exactly as:  mission


    9.  Describe the contact will always be the filename without the .mis extension – for this example:  KE5746_19450129_MP_GWM_Convoy CM60


    10.  For heading of the contact, place a – (dash) in the field:


    11.  Date you found contact will be the date listed in the file name will be read automatically, simply enter a  – (dash) in the field:


    12.  Year is ignored in this case, just enter a – (dash).


    13.  For add a comment on your sighting, must always be listed exactly as:  none


    14.  Your email address is not used and not necessary, simply enter a – (dash) in the field:


    15.  For the picture/screenshot, you must must always be listed exactly as:   file://


    16.  You will then receive a notification about the next prompt requiring you to select the position on the map:


    17.  Be sure to select as close of a position for the 6 digit grid coordinates.  In this example it is KE5746, which if you notice, there is no grid for KE.  You must go to this link:  http://www.navalgrid.com/find   and enter the grid coordinates:


    Then select Find and scroll out on the map until you can easily identify where your position will be on the Spinnennetz map:


    In this case, it is west of Madagascar roughly ½ between there and Mozambique, so you would select here on the Spinnennetz provided map:


    After receiving the message that the coordinates have been entered, click OK.

    18.  You are now ready to View the Contact Report (double click on it):


    Review that the data you entered is correct (currently only a limited amount is displayed), press a key to return to the main OS Client window.  If you messed up and need to resubmit, simply press a key, go back to step 1 and build a new contact report.

    19.  Once satisfied, you are now ready to send the Contact Report (double click):


    If the Send contact report responds that data is ok and is compressed, transferred and written to log, all is good!  Press any key to continue.

    If for some reason there are errors listed, please take a screen shot (use Print Screen key on your keyboard) and contact us at staff@donitzeliteflotilla.com, attaching the image to the email, along with your description of the error.

    However, it the program says “try again later” please do try again later before bothering to send an email to us.  Danke!
« Last Edit: 20180328, 11:39:20 by BL!TZKR!EG »

Offline REV_BL!TZKR!EG

  • ...somewhere...below...
  • REViSi0N
  • one of the leaders
  • Posts: 1.998
  • ELiTE Skill Level:
    62.5%
  • TECH ADMiN
    • Links!!
= What is the aim here? =
« Reply #1 on: 20180328, 11:40:01 »
Background:

After endless ignorance, procrastination and deliberate sabotage by the SuSi-whiners-posse against us, it has been decided to kick "The SuSi-whiners-forum formerly known as SUBSIM.com" from the table of options and no longer host files there.

After Operation Kernevel I and II (the evacuation of |DEF| and our files there) we want to be independent of censorship, limited discretion and complete arbitrariness. This means to "LSB 2018" and move on.

Consequently, the decision has been made: Reconstruct mission presentations and use our own map and our own servers for hosting all these missions FOR FREE and WITHOUT ENFORCED REGISTRATION.

Every mission
  • can be downloaded FREELY and WITHOUT LIMITATIONS
  • follows a name-convention in its filename
  • is visible on our Mission Map
  • and therefore appears in the PQ where it is happening
  • has the DEF-radio-trigger built-in
Every mission-description
  • goes to a page on DEFF (our |DEF|-forum)
  • where details on the very mission are properly presented AND CAN BE UPDATED BY US, the authors
  • offers links to instructions, our TeamSpeak-server and of course the mission-download itself (hosted on DEFMS)
Everybody
  • who is willing to share playable missions can do by adhering to the following instructions
  • We award PBP for diligence: Every proper mission-report submitted by an active |DEF|-member is rewarded!
So please!
Write a meaningful description!
« Last Edit: 20181008, 12:56:07 by DEF_BL!TZKR!EG »
» HONOR, AMISTAD Y RESPETO! Es mejor morir de pie que vivir toda una vida de rodillas! «

⚡️ Home of S3A - S3F - S3G - DEFTS3 -

Offline REV_BL!TZKR!EG

  • ...somewhere...below...
  • REViSi0N
  • one of the leaders
  • Posts: 1.998
  • ELiTE Skill Level:
    62.5%
  • TECH ADMiN
    • Links!!
Guide to Reporting Multiplayer Missions for S3MA - The SH3 Mission Archive
using S3MT - The SH3 Mission Toolkit

1. Verify that the mission you want to report has not already been reported by reviewing the Mission Editing-area and THE SILENT HUNTER III - MISSION ARCHIVE

2. If you have not already done so, download and unpack the Mission Toolkit (S3MT): SH3 Mission Toolkit
You can run S3MT.exe from any folder-location you like, make sure it can access our server (allow it though Antivirus/Firewall-Software).

3. The first thing Gatordad liked to do is run LUCMIS and determine if the mission he was reporting looks like it may be compatible with SH3 14b, GWX and/or GWM. LUCMIS will identify any missing units, which will definitely result in crash to desktop (ctd) when you try to run the mission in that version (14b, GWX or GWM). You have to do this individually for each install:

a. Start LUCMIS


b. Select the mission you are reporting


c. Select the version of SH3 you want LUCMIS to check. In this example, check 14b compatibility was selected


d. Notepad will open with the report created by LUCMIS.  This report displays the types of all of the units used in the selected mission. Further down within this report, LUCMIS displays any units that are missing/not found in this version of SH3 (in this case, SilentHunterIII).  This data is useful in that it lets you know that this mission will not run in 14b (SilentHunterIII).


e. Repeat this process for GWX and GWM installs.  You will then know if this mission will most likely run in GWX and GWM based on the LUCMIS reports.  If there are no missing units, that version will most likely run the mission, but you will need to run it in that version to verify.

It is recommended to test the mission at this time in the lowest version (14b < GWX < GWM) where LUCMIS indicated no missing units.  In this case: GWX.  If it runs and you are in the mission, stay with it long enough to verify or determine a good detailed but brief summary. If it does not run in GWX, for example, then run the mission in GWM.
« Last Edit: 20200402, 12:45:47 by REV_BL!TZKR!EG »
» HONOR, AMISTAD Y RESPETO! Es mejor morir de pie que vivir toda una vida de rodillas! «

⚡️ Home of S3A - S3F - S3G - DEFTS3 -

Offline REV_BL!TZKR!EG

  • ...somewhere...below...
  • REViSi0N
  • one of the leaders
  • Posts: 1.998
  • ELiTE Skill Level:
    62.5%
  • TECH ADMiN
    • Links!!
9. Now it is time to "File a report for the S3MA"

Select "File a report for the S3MA",

10. Enter your U-boot number (remember the dash " - " is required (e.g. U-###) - this is because active DEF-members get bonus points herefor!
If you are (not yet) a DEF-member, but want to submit your mission to the archive, enter U-0.


11. The initial S3MA-Report window is now visible, we must now load the mission by selecting "Load Mis":


12. Browse to the location and point S3MA to the mission file you are using to prepare your report, and select "Open",


13. S3MA will now display the basic details of the mission. We will proceed in the numerical order indicated within this image:


14. Now it is time to fill in the details of the mission, progressing numerically in order, as indicated in the previous image.  We start with 1 showing the picture window, this will display the constructed report.

15. Mission-Name: This will be the basic name minus grid, date, mod and op data.  This name should have only the first letter capitalized in each word and should not exceed 51 characters.  Leave out punctuation and other symbols (such as & / . , ' "). For this mission, the name will be Spam Jam And Search Lights

ANOTHER IMPORTANT THING! Remove all numbering from this part!
Example: Someone called the file 03-Mission_Alpha ->> Then remove the "03-", we do not use numbering of other groups in our format!


16. MOD: This is the lowest version that will run the mission (14b being the lowest, GWM the highest). In this instance, GWX ran this mission but 14b (stock SH3) would not, so select GWX for the MOD.


17.  Mission Description: Be creative with this description. More often than not, what is available in the mission parameters is vague or limited.  Once you see how the mission starts in game, and view the initial locations on the navigation map, you will have a better idea how to start your description.  This is what I decided for this mission:  "It is the Fall of 1942. England is fighting for its life. The U-Bootwaffe is sinking more ships every month. A convoy has been detected bearing 060 degrees. Now is your chance to send more to their watery grave. Good hunting!" 

Note:  You are limited to the three lines - just as you can see in the preview. Anything further will be wasted effort.


18. Select the Ocean/Sea location of the mission. For this mission, it is Nord_Atlantik (North Atlantic). These are in German to match the navigation map in GWM. If you aren't sure of the meaning, use an onling German to English translator.


19. Free text to describe the location a little more - this needs to be very brief (short) and gives a bit more detail about the location.  In this case, "400 km south of Iceland" is about as descriptive as I could get.


20. Maximum # of players: The new version of S3MT scans the mission file and determines by itself what the max players is, so this has changed a bit and it is now less work.


21. Recommended U-Boot-Type: Simply select from the drop down window based on the information you obtained in 7. In this case, VIIc (Note: pay very close attention and only use VIIc/41, VIIc/42, IXc/40 when it is listed exactly as VIIc/41, VIIc/42, IXc/40!  When listed for example, as VIIc, 1941 or VIIc-1941 or VIIc-41, it is not a VIIc/41!)


22. Objective-Type: This will most likely be FIC (Fictional) unless the mission file viewed in Notepad specifies it is based on a historical event, which would indicate this is a RUM (Real U-boot Mission), or a SpecOp (Special Operation) mission based on covert actions, for example. This particular mission is fictional, so I selected FIC.


23. Credits: To determine the author/creator of the mission, refer back to the mission file that you opened in Notepad, and look through the description at the beginning of the file, there should be the creator's name listed at the end of the description, if not, check the very end of the file. On a rare occasion, the creator failed to list his/her name and you would have to list as anonymous or unknown.  This particular mission was created by Blackswan40, so I enter this data after "written by" in this field.

« Last Edit: 20200402, 04:18:45 by REV_BL!TZKR!EG »
» HONOR, AMISTAD Y RESPETO! Es mejor morir de pie que vivir toda una vida de rodillas! «

⚡️ Home of S3A - S3F - S3G - DEFTS3 -

gatordad

  • Guest
24. UPDATE:  At this point, we are ready to update the report picture with all of the data we entered. Press the UPDATE button and review/verify the data in the picture matches the data you entered in the required fields. If any changes are needed, do so in the proper fields in the bottom half of the window. 


25. It is time to get the X and Y coordinates.  Press the GET COORDS button, which will open two browser windows (Naval Grid Calculator and Operation Spinnennetz)

26. This step was obsolete

27. In the Operation Spinnennetz browser window, find the location based on the previous map view and the actual grid AL3257 with the cursor.  Once you have located the precise (accurate as possible) spot, press your left mouse button.

28. The X and Y coordinate window will appear.  Take note (I write them down) of the X and Y coordinates and then press OK. For this mission, X = 2948 and Y = 690. You can close these two browser windows.


29. Now it is time to enter the X and Y coordinates in the S3MA window. You will note there are 4 characters (these are required) for each X and Y coordinates (XXXX and YYYY in the windows).  Enter the X and Y coordinates obtained from Operation Spinnennetz map:  X = 2948 and Y = 690.  These need to be 4 characters in length, which is why the newest version of S3MT trims this by adding leading ZEROs to make it a full 4 characters.  Never add to the end as this will throw off that coordinate significantly.  Placing the 0 or 00 before three or fewer characters has no adverse effect.


30. Now it is time to give everything a final review to be certain you have no errors/mistakes that will need to be corrected.  If you find one (or more), make the correction and press the UPDATE button to put the changes into the picture.

31. It is now time to submit the report. Simply press the REPORT button and S3MA will file your report.


32. When S3MA files the report, Notepad will open (provided you followed the instructions in 8., above. Highlight and copy all of the data below the "COPY AND PASTE THIS INTO A NEWLY CREATED THREAD AT DEFF:" caption.  It is best not to close this Notepad file yet, in case you did not copy correctly or copied over it on clipboard.  This information needs to be posted in a new thread you will create on the Multiplayer Mission Briefing forum (next step below).


33. You will see a message that your mission report has been properly submitted.  Press OK, then EXIT and S3MA will close.

34. Now, a window will be automatically created so you can create a post on DEFF (DEF Forums). Paste the data copied from the Notepad file that opened when you filed the report with S3MA into the large rectangular box. Find the line with the file name (minus the .png) and copy and paste in the subject line above the editor window. Now it is time to Preview the results, press the Preview button, bottom right.  Correct by repaste if needed from Notepad.


37. If all is good, post your report data by pressing the Post button on the bottom right. Done!

« Last Edit: 20200402, 12:40:59 by REV_BL!TZKR!EG »